3 Steps to Starting a Successful Portrait

Golden
Oil • 10" x 8"


Do you dream of painting Rembrandts, but always seem to end up with Picassos? Maybe your past attempts at portrait painting have looked “flat” and formless. Perhaps you had “chalky” or “muddy” skin tones.

If these are familiar struggles for you, I’d like to tell you you’re not alone—My early attempts at painting portraits from life awarded me big, fat “C’s” in art school!

But I also want to share with you that there is light at the end of the tunnel. It is possible to learn how to paint portraits, and I'd like to share how.

The free art lesson below is the first in a series about portrait and figure painting. I'll share these lessons over the next several weeks. Of course, I can’t promise you’ll be painting like Rembrandt by the end of this series, but I will share the foundational info you need as you develop your skills through dedicated practice.

This series of lessons will prepare you to dig even deeper in my online video course. Access to the online video course will be available for purchase starting October 7, 2019. In the meantime, these free art lessons will supplement the course by teaching supporting concepts—please enjoy this gift from me to you!

Your portrait will not end well if it is not started well. So let's get started!


Step 1:
Drawing a Basic
Shape for the Head


Picasso’s rearrangement of facial features was intentional. But if you’re like me, you’d rather place a model’s features in the correct spots. There’s nothing more maddening than spending hours painting an eye, only to realize later you placed it too high—I know. I’ve been there many times!

This business of putting the right shapes in the right places is what I simply call “drawing.” And this type of drawing is the foundation of a representational painting. For this reason, your portrait will only be as strong as the foundation of drawing upon which it is built.

Let's start building!


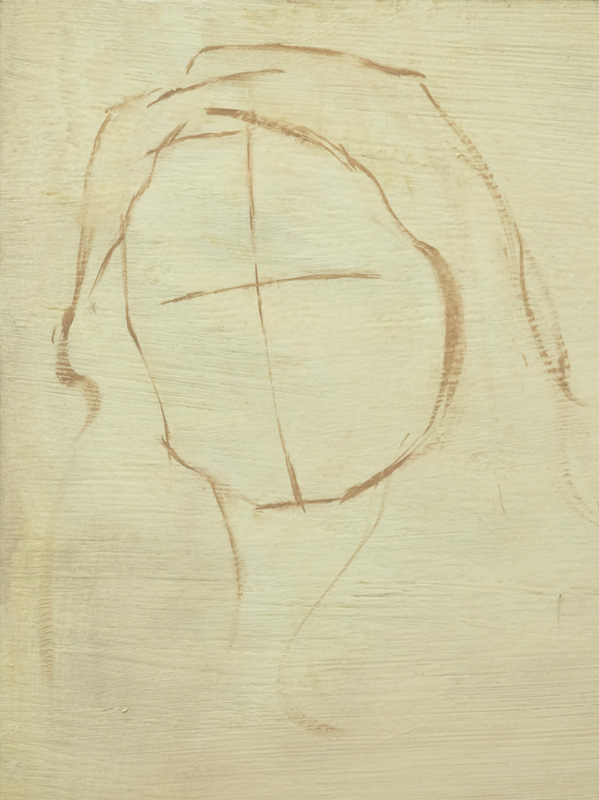
From the front, the head is basically an oval or egg shape. I usually draw the outline of the head with basic angles as shown above.

As you draw this initial shape, look at the subject and ask, “how tall is the head compared to how wide?” Do your best to draw the shape accordingly. Don’t worry if you don’t get it perfect on the first try—you can always modify the shape later as needed.

Tip: Use a charcoal pencil
or a flat brush with a fine edge
to draw with thin, precise lines


Next, draw simple lines for the boundaries of the hair to help you further envision the head. Notice—even though I erased most of the outline of the head underneath the hair, I kept a mark for the very top of her skull. You’ll use this important mark to make a few measurements in the following steps.


Step 2:
Establishing the Tilt and
Rotation of the Model’s Head…
With Just a Single Line


In this case, the model's tilt is very slight. Still, the tilt can be seen when we hold up a brush handle vertically for comparison (right).

Also, note how much her head is rotated side-to-side. Although her eyes are looking right at us, her head is rotated slightly away.


Keeping these bits of info in mind, draw a line down through the center of the face.

Notice my line is slightly curved. Even in this early stage, I’m trying to envision the head as a rounded mass—not flat.

This line establishes the tilt and rotation of the model’s head and helps place the features correctly.


Step 3:
Placing the Eyes, Nose and Mouth…
NON-Picasso-Style

Perpendicular to this line, other lines can be drawn to place the center of the eyes, the base of the nose, and the mouth opening. First, the center of the eyes…

The following 3 rules of proportion are a huge help for drawing accurately:
 
1. The centers of the eyes are halfway between the bottom of the chin and the top of the skull (left).


Left: Once a guide is drawn for the eyes, estimate where the brows should be placed between the eyes and hairline.


2. The base of the nose is about halfway between the brows and the bottom of the chin.

3. The mouth opening is at the top 3rd between the base of the nose and the bottom of the chin.

Tip: The eyes, the base of the nose,
the mouth and the bottom of the chin
should all look parallel to each other.


With just a few marks, you can establish a solid foundation for your painting. If you start with a strong foundation, you will have a much higher chance of ending with a successful portrait.

If you found this lesson valuable, you'll learn even more in the online video course. Access to the course will be available for purchase starting October 7, 2019. However, you can start today for FREE! Click the button below for more details.

Learn More About Online Video Course

Now for the next step: Making Your Flat Portraits Look 3-D.


Art of the Portrait Conference

Us (right) with TJ and Julie Cunningham, our
friends from PCC. TJ won Fifth Place this year!
Andrea and I had an amazing weekend at our first Portrait Society of America "Art of the Portrait" Conference! The conference faculty members are some of the most highly skilled painters in the fine art industry. Attendees glean from their experience as they lecture and demonstrate during the four-day event. The conference culminates in the Awards Gala Banquet, where the winners of International Portrait Competition are announced. This year, the annual conference was held in Reston, VA, outside Washington DC.


Face-Off
Activities commenced with the annual Face-Off event. Fifteen faculty members painted portraits from life for the roughly 750 attendees. See all the face-off portraits at Underpaintings Blog.


Face-Off Demo by Jeff Hein


Faculty Demos
Throughout the conference, faculty artists shared their knowledge through informative demonstrations. On several occasions, James Gurney set up off-stage and painted these artists as they demoed (see video below).


In-progress demos by Jeff Hein (left) and Quang Ho

In-progress demo by Mary Whyte

In-progress demos by Robert Liberace (left) and Rose Frantzen


Recreational Painting
TJ had the great idea to do some portrait painting in the host hotel's lobby. Why not! At first, it was just us. Then little by little, more artists joined in until we had quite a crowd.

Tim and I painting artist Isaiah Hoppe


A crowd gathers!


Gold Medal Award for Lifetime Achievement
This year's award went to master artist Joe Bowler. Because he is handicapped, he was not able to attend the conference. His former protégé Brian Neher presented his award while conference attendees watched via the Internet. Bowler's recognition was meaningful to Andrea and me because Bowler's portraits of our college's president and his wife provided continual instruction and inspiration while we pursued our art studies. You can view Bowler's work at his website here.


Congrats to the finalists!
Click names to visit artists' websites • Click here to view finalists' paintings 

William Draper Grand Prize
A Father's Dreams and a Son's Love

By Bryce Billings
Draper Grand Prize & People's Choice: Bryce Billings
1st Place Painting: Tony Pro
1st Place Sculpture: Alicia Ponzio
2nd Place: Jeff Hein
3rd Place: Kelly Carmody
4rth Place: Aron Belka
5th Place: TJ Cunningham
1st Honor Award: Seth Haverkamp
2nd Honor Award: Adam Clague
3rd Honor Award: Olga Krimon
Certificates of Excellence: Paul Batch, Aimee Erickson, Gavin Glakas, Kristy Gordon, Barbara Kiwak, Sandra Kuck, Clement Kwan, Ricky Mujica, Aapo Pukk, James Tennison, Wesley Wofford


Knitter's Gift
Oil on linen • 30"x30" • Available 6/7/14 at the OPA National
(To inquire, contact the Bennington Center for the Arts)
I praise God for allowing me to win the 2nd Honor Award for my painting, Knitter's Gift! I am so humbled and honored.

Andrea and I had a blast at the conference, and are looking forward to attending the conference next year in Atlanta!


Be the first to see our latest paintings

Subscribe to Our Latest Artwork & Adventures email newsletter below to see our new work before the general public. If a painting catches your eye, you'll have first dibs on purchasing.


Painting Siblings

No, this isn't a post about double portraits. It's actually about two paintings that are, in a way, "siblings."

Steering Home
Oil on linen • 6"x6" • Sold
Prayers For His Voyage
Oil on linen • 6"x6" • Sold


In 2010, while visiting relatives, I painted a still life of objects I collected from my grandmother and aunt ("Prayers For His Voyage," above). The painting represents a woman praying for a loved one who is abroad (perhaps at sea or war). The Bible represents her faith, and the candle symbolizes her hope.

I sold the piece recently, and it was not long before the client presented me with a brilliant idea—perhaps I could create a companion painting that depicts the story from the man's point of view. "What a great idea!" I thought, and soon began setting my mind to the task. I used some of the same symbolism from the first painting, including a candle for the man's hope and a Bible for his faith. I depicted the man as a sailor, steering towards the light and nearer to his loved one, who is pictured in a locket. The rocks represent his ever-present dangers, against which her prayers protect.

These two paintings now hang side-by-side. Each shares a side of the tale, and together, they tell the full story.

Be the first to see our latest paintings

Subscribe to Our Latest Artwork & Adventures email newsletter below to see our new work before the general public. If a painting catches your eye, you'll have first dibs on purchasing.


My Favorite Thing to Paint

Dan (by Andrea)
Oil on linen panel • 10"x8" • Available
(To inquire, email artsy_orrnge@yahoo.com)
While Andrea and I studied at Pensacola Christian College, our all-time favorite art course was Figure Painting with artist-in-residence Brian Jekel (view his work here). The class met for two hours each Tuesday evening to paint a clothed model from life. Each model would pose for two consecutive weeks, and we were not permitted to work on our paintings outside of class. The limited time-frame and complex subject was a unique challenge I found exhilarating. Soon, creating portraits from life became my favorite painting activity. In fact, I loved it so much, I elected to take the class three times!

After Andrea and I graduated, we greatly missed painting people from life as often. When we moved to Missouri, we dreamed of one day opening our studio for group life-painting sessions. Thanks to my industrious mother, who almost single-handedly prepared our studio, we were able to host our first session last September. We've been meeting every Thursday night since, and the response has been wonderful. It has been a joy to paint people from life again and to meet such great new friends.

Our sessions are open to all Kansas City area artists. If you would be interested in joining us, please visit our Facebook Group here and click "Join Group." Click the "Events" tab to see a list of upcoming sessions, then select the one you'd like to attend. If there are 10 or fewer people coming (our comfortable max), click "Going." Please send me a private message on Facebook for directions to our studio. We ask everyone to bring a portable easel, supplies and $6 for the model. We look forward to seeing you!


Our Painting Group


Just a few of our painting buddies
(Click their names to visit their websites)

L to R: Crystal Manning, Wanda Greene,
Polly Plain (back), Eileen McCoy,
Andrea, me, Ryan Delgado, Peggy Wilson


A Few of Our Thursday Night Paintings

(Many more paintings and photos from our sessions can frequently be found
at Peggy Wilson's blog and Greenverdugo Art's Facebook page.)


Daniel (by Andrea)
Oil on linen • 12"x9" • Available
(To inquire, email artsy_orrnge@yahoo.com)

Micah (by Adam)
Oil on gesso panel • 12"x9" • Available
(To inquire, email Contact@AdamClague.com)

Judy (by Adam)
Oil on gesso panel • 12"x12" • Sold

Matthias (by Adam)
Oil on gesso panel • 12"x12" • Sold

Bo (by Adam)
Oil on gesso panel • 16"x12" •
In a private collection

Be the first to see our latest paintings

Subscribe to Our Latest Artwork & Adventures email newsletter below to see our new work before the general public. If a painting catches your eye, you'll have first dibs on purchasing.


Christmas Traditions

I decided to dedicate my first blog post of 2014 to a glance back at Christmas 2013.

2013 Christmas Tree
Oil on linen • 8"x6"
2012 Christmas Tree
Oil on linen • 7"x5"

 
Harvesting our 2012 "tree."
Our 2013 tree was a full (though tiny) tree
Last Christmas (2012), Andrea's and my first together, we instated two traditions: 1) harvesting a live Christmas tree and 2) painting it from life. These last two Christmases, we enjoyed picking our trees from our own yard.


Please excuse my ragged painting garb
These paintings are a lot of fun, but are also challenging for a few reasons:

1 The lights of the tree look most dramatic when there is little or no other light in the room. This poses the problem of poorly-lit canvases. This year, Andrea clamped a battery-operated barbeque light to her easel. I used a spotlight and placed it outside the doorway so the door frame would help mask the light's influence inside the room.

2 This year, we decided to paint our tree with the shade opened, so we could capture the lights reflected in the window. I found I had to paint these reflections softer and dimmer than the actual bulbs to prevent them from reading as part of the actual tree.

3 Since the light bulbs are at all different angles to the eye and are hidden to various degrees by branches and ornaments, they appear to have differing levels of brightness. If I paint all the bulbs the same brightness, they simply don't look realistic. To achieve the correct effect in my painting, I first have to choose one bulb to be the brightest. I then have to dim the others in the correct proportion to that brightest bulb. The key to accurately comparing values (darks and lights) is to squint slightly at the subject. When your eyelashes come together, your visible range of values is compressed, making it easier to determine how much lighter or darker one value is compared to another. Once I determine how much dimmer each bulb is compared to the brightest one, I have to make sure those same relationships hold true on my canvas.

At the top of my 2013 painting, my stocking is to the left and Andrea's is to the right. They're both hanging at the same level, but Andrea's stretched out longer. Apparently candy is heavier than coal.

Merry Christmas, everyone (really, really late)!

Be the first to see our latest paintings

Subscribe to Our Latest Artwork & Adventures email newsletter below to see our new work before the general public. If a painting catches your eye, you'll have first dibs on purchasing.


Babysitters

Babysitters
Oil on linen • 18"x24" • Sold
The scene in my recent painting Babysitters was a real-life moment I never would have been able to stage. Andrea and I had been visiting friends, and all of us were exhausted one day after a long drive. I was considering a nap, when I wandered into our friends' sitting room to find them already dozing. Mommy and Auntie were sound asleep, but our friends' 2-year-old son was held in the fringes of consciousness by a video on Auntie's iPod. Topping off the touching moment was the beautiful, cool window light bathing the trio. I knew I had to act quickly if I wanted to capture this tender-but-fleeting scene!


I grabbed my gear and set up as quietly as I could. Sooner than I had hoped, the girls stirred, the little guy moved, and rest-time was over. Fortunately, it was not before I had noted some values on my canvas and taken a few photos.

Scottsdale Salon ad in Nov. issue of
American Art Collector Magazine
I count it a great privilege to have my painting accepted into the Scottsdale Salon of Fine Art at Legacy Gallery in Scottsdale, AZ. The exhibit runs 11/7/13 through 12/31/13. It was a tremendous surprise and honor to learn my painting had received the Southwest Art Magazine Merit Award! Thank you, Southwest Art Magazine, for sponsoring this award, and thank you so much, Bob and Curtice McCloy, for choosing my painting. I praise God for enabling me to paint this piece and for this incredible blessing!

Updates 

2013
"Babysitters" received 3rd Place, Oil Painters of America Fall Online Showcase

2015–2016 
"Babysitters" received Purchase Award, Art Renewal Center Intl SalonExhibited at the Museum of European Art Modern in Barcelona, Spain and at the Salmagundi Club in New York City

Work In Progress (click thumbnails to enlarge)

3"x4" preliminary sketch
Stage 1
Stage 2
Stage 3
Stage 4
Stage 5
Stage 6


Be the first to see our latest paintings

Subscribe to Our Latest Artwork & Adventures email newsletter below to see our new work before the general public. If a painting catches your eye, you'll have first dibs on purchasing.


Brush Creek Art Exhibit Opening Tomorrow!

Roadside Planter by Andrea Orr Clague
Roadside Planter by Andrea
Oil on gesso board • 12"x9" • $540
----------------------------------------
On display Oct 3–24
in the Brush Creek Art Walk Exhibit
at the Bruce R. Watkins Cultural Center.
To inquire, email Contact@AdamClague.com
An exciting plein air art exhibit opens tomorrow night, October 3, in Kansas City, Missouri!

Between September 13 and 15, over 70 artists set up their easels along the city's Brush Creek to paint its beautiful views. A selection of these works will be displayed and for sale at the 2nd Annual Brush Creek Art Walk Exhibit, October 3–24 at the Bruce R. Watkins Cultural Center (3700 Blue Parkway). The Opening Reception is tomorrow night, Thursday the 3rd, from 5–8pm at the BRWCC. Andrea and I are honored to have paintings in the exhibit, and we hope you can make it out sometime to see the show!

Update Oct 4, 2013
Andrea and I were so honored to receive awards at the opening! There were 4 "zones" along Brush Creek in which artists could paint. 1st, 2nd, and Honorable Mention awards were given in each zone. Andrea was awarded an Honorable Mention for her "River Bass," and I received a 1st and 2nd for my "Passing Through" and "River Rock." We are so grateful to our juror, Eva Reynolds of Eva Reynolds Fine Arts, for selecting our pieces, and we praise the Lord for enabling us to paint them!

It was a great opening night, with amazing refreshments by Succotash. We say big thank you's to Anne Garney for organizing the event and to Eva Reynolds for jurying. Congrats to all the winners! Pictures of the artists and their winning paintings can be seen on Brush Creek Art Walk's Facebook timeline. Be sure to check them out!


River Bass by Andrea Orr Clague
River Bass by Andrea
Oil on gesso board • 10"x8" • Sold
Honorable Mention
----------------------------------------
On display Oct 3–24
in the Brush Creek Art Walk Exhibit
at the Bruce R. Watkins Cultural Center

River Rock by Adam Clague
River Rock by Adam
Oil on gesso board • 8"x10" • $400
2nd Place
----------------------------------------
On display Oct 3–24
in the Brush Creek Art Walk Exhibit
at the Bruce R. Watkins Cultural Center.
To inquire, email Contact@AdamClague.com

Passing Through by Adam Clague
Passing Through by Adam
Oil on gesso board • 9"x12" • $540
1st Place
----------------------------------------
On display Oct 3–24
in the Brush Creek Art Walk Exhibit
at the Bruce R. Watkins Cultural Center.
To inquire, email Contact@AdamClague.com

Congrats to Patrick Saunders, winner of
the $500 Quick Paint Purchase Award!
Presented by David Field Oliver

Kimbell McCurry
(See his beautiful work here)
Check out more great event pics in Brush Creek Art Walk's Facebook albums: Day 1, Day 2, Day 3