
 |
| Golden Oil • 10" x 8" |
Do you dream of painting Rembrandts, but always seem to end up with Picassos? Maybe your past attempts at portrait painting have looked “flat” and formless. Perhaps you had “chalky” or “muddy” skin tones.
If these are familiar struggles for you, I’d like to tell you you’re not alone—My early attempts at painting portraits from life awarded me big, fat “C’s” in art school!
But I also want to share with you that there is light at the end of the tunnel. It is possible to learn how to paint portraits, and I'd like to share how.
The free art lesson below is the first in a series about portrait and figure painting. I'll share these lessons over the next several weeks. Of course, I can’t promise you’ll be painting like Rembrandt by the end of this series, but I will share the foundational info you need as you develop your skills through dedicated practice.
This series of lessons will prepare you to dig even deeper in my online video course. Access to the online video course will be available for purchase starting October 7, 2019. In the meantime, these free art lessons will supplement the course by teaching supporting concepts—please enjoy this gift from me to you!
Your portrait will not end well if it is not started well. So let's get started!
Step 1:
Drawing a Basic
Shape for the Head
Picasso’s rearrangement of facial features was intentional. But if you’re like me, you’d rather place a model’s features in the correct spots. There’s nothing more maddening than spending hours painting an eye, only to realize later you placed it too high—I know. I’ve been there many times!
This business of putting the right shapes in the right places is what I simply call “drawing.” And this type of drawing is the foundation of a representational painting. For this reason, your portrait will only be as strong as the foundation of drawing upon which it is built.
Let's start building!

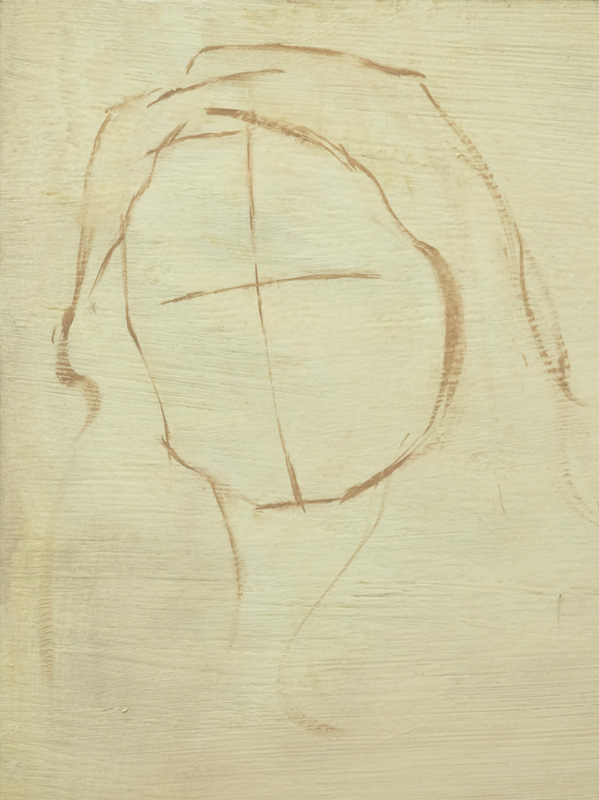
From the front, the head is basically an oval or egg shape. I usually draw the outline of the head with basic angles as shown above.
As you draw this initial shape, look at the subject and ask, “how tall is the head compared to how wide?” Do your best to draw the shape accordingly. Don’t worry if you don’t get it perfect on the first try—you can always modify the shape later as needed.
Tip: Use a charcoal pencil
or a flat brush with a fine edge
to draw with thin, precise lines
or a flat brush with a fine edge
to draw with thin, precise lines

Step 2:
Establishing the Tilt and
Rotation of the Model’s Head…
With Just a Single Line

Also, note how much her head is rotated side-to-side. Although her eyes are looking right at us, her head is rotated slightly away.

Notice my line is slightly curved. Even in this early stage, I’m trying to envision the head as a rounded mass—not flat.
This line establishes the tilt and rotation of the model’s head and helps place the features correctly.
Step 3:
Placing the Eyes, Nose and Mouth…
NON-Picasso-Style
The following 3 rules of proportion are a huge help for drawing accurately:
1. The centers of the eyes are halfway between the bottom of the chin and the top of the skull (left).


3. The mouth opening is at the top 3rd between the base of the nose and the bottom of the chin.
Tip: The eyes, the base of the nose,
the mouth and the bottom of the chin
should all look parallel to each other.
the mouth and the bottom of the chin
should all look parallel to each other.
|
Now for the next step: Making Your Flat Portraits Look 3-D.